

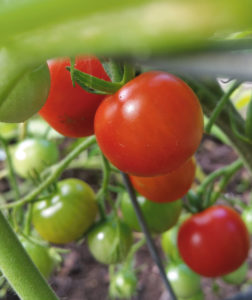
We are blessed on the Central Coast with an almost perfect climate to grow the star of summer salads bowls – the tomato.
And the best time to plant is right now.
Although this plant does need constant care throughout its growing season, your commitment will pay off with a taste that cannot be replicated by their bagged supermarket cousins.
Our garden centres are becoming awash with bright new tomato seedlings and while some places are offering an increasing array of varieties, you will find that there is a far greater range available as seeds.
Heirloom varieties are also worth investing in as they add a beautiful feel to your garden along with interesting tastes and textures on the dinner plate.
Coast Garden Tomato Suggestions
Everyone needs a ‘Tommy Toe’.
They are a sweet cherry tomato on the larger size and are very easy to care for.
Newbies to tomato growing should also try Mama’s Delight as it produces lovely salad fruits and is another easy-grow plant.
Looking for a tomato with a lower acidity? Then try ‘Yellow Mellow’.
Or extend your tomato harvest by popping in the much favoured ‘Apollo’ for an early crop and a ‘Grosse Lisse’ for a mid to late crop.
Those planning on planting into pots could try the yummy ‘Patio Roma’ or for a burst of colour, the tiny ‘Tumbler Yellow’, which can also be successfully grown in hanging baskets.
Heirlooms that you just have to grow at least once in your life include the juicy all-rounder ‘Brandywine’, the smoky flavoured ‘Black Russian’ and ‘Jaune Flamme’.
And finally, for the tomato aficionados and foodies, you will adore the delightfully complex flavours of ‘Black Krim’.
Position and Soil
Tomato (Solanum lycopersicum) need a warm spot to thrive in that receives at least six full hours of direct sunshine each day.
They do not do well with frost, or wind, so planting must be undertaken after the last frost and in a sheltered position.
Check with each variety for exact details, but generally space plants around 50cm apart.
This crop needs to grow in a different bed each year as they are heavy feeders of nitrogen, and potassium phosphorus.
Diseases that you may have unfortunately encountered with your tomato crop the previous season can remain in the soil for up to three years.
A good plant to pop in after tomatoes is any bean as they will add nitrogen to the soil.
Although tomatoes are not too fussy about their soil types, for the best crops, it should have a pH level of 5.8 to 6.8, be high in organic matter and be free draining.
Prepare beds with an organic vegetable fertiliser, a good layer of well-rotted animal manure (chicken works very well) and one of compost. Work these together to provide a rich, growing base to promote tomatoes that will thrive right through the season.
Planting
I have a ‘three stage’ method of raising tomatoes from seed to avoid early spring pest problems and to save space for late winter crops that may still be thriving.
Seeds takes about 7 to 10 days to germinate and are best planted in a seed raising mix in trays.
Keep moist, but do not overwater as they are prone to root rot and place in a sunny, warm position.
Once germination occurs, move each viable seedling to its own small pot of 50 per cent compost and 50 per cent good quality potting mix.
Add about ¼ teaspoon of sulphate potash and do not fertilise with any nitrogen based fertilise as these can make the plant focus too much on leaf production and not on flower and fruit production.
Once roots have completely filled the new pot, let the soil become lightly dry and then transplant into the garden.
Plant each 1m apart into position by covering the stem to just over the first two leaves as this will encourage deeper root growth. Feed each plant with an organic fertiliser and water.
Provide support for each plant by either using a tomato cage or plant trellis or by surround with 3 to 4 wooden stakes.
These need to be at least 1.5m in length for most varieties and 2m is best.
Tomato stems break easily so as the plant grows, tie to stakes or trellis with a soft, flexible garden tie.
Something with a bit of give is best and old pantyhose is a brilliant eco solution that actually is best for the plant as well.
It gives room to grow without cutting into the stem.
Lastly, add mulch to the top of the soil as this will help retain nutrients and water and deter weeds and pests.
Snip off some of the lateral stems as the plant grows to increase air circulation.
Care and Harvesting
To ensure a healthy plant and well-developed fruits, steady, deep watering should be undertaken.
Do not let soil dry out but do not over-water either.
Water in the early morning around the base of the plant only as water on the leaves encourages disease and pests.
I am a big fan of liquid seaweed fertilisers and find that tomatoes thrive with a weekly drink at half the recommended strength for vegetables.
Once a fortnight feed with your organic fertiliser and to encourage the plant to uptake nutrients also add a heaped tablespoon of sulphate of potash.
Tomatoes are best left on the vine to fully ripen before harvest to ensure full flavour and are usually ready to pick at around 14 weeks.
Never pull them off the vine as it will damage the plant.
Cut off with sharp secateurs or scissors.
Fruit can be harvested when unripe and will ripen.
Trouble-shooting
Although disease resistance has been bred into many varieties, you still may encounter problems.
Some things to watch for are:
‘Septoria leaf spot’ – small white/grey spots with black edges and yellowed leaves that fall.
‘Anthracnose’ – small indented circles surrounded by rings on tomato.
‘Early Blight’ – lower leaves or stems have target-like black or brown spots.
‘Late Blight’ – odd-shaped, green-black shapes on leaves and tomatoes can brown rotting areas.
These are all fungus diseases and are encouraged by over-watering, crowding of plants and a lack of air-circulation.
Treat affected plants with a fungicide formulated for tomatoes.
Water the base of plant, not the leaves and do so only in the late evening.
Black spots, specks and cankers on leaves and tomatoes are signs of bacterial diseases and are best treated as you would the fungal problems above.
You can also try ‘fixed copper sprays’ as soon as you notice the problem as it can reduce the spread.
If a plant loses colour in the lower or top leaves and then the tips die back, it will most likely have wilt diseases ‘Fusarium’ and ‘Verticillium Wilt’, caused by a fungi in the soil.
There is no cure for this – plants must be removed and not placed in compost.
A mosaic-like patterns on the leaves in light yellow and green with mottling appearing at times on the fruit is ‘Mosaic Virus’ and enters the plant through cuts in its structure.
It will lead to a much smaller crop but will not kill the plant.
There is no ‘cure’ for this either but, as it is a virus, you can stop the spread by washing hands and tools.
For some upcoming events, you might head along to the Australian Plant Society, Central Coast Division Monthly Meeting (12 Sep, 2pm) for a discussion of wind and drought tolerant plants (https://austplants.com.au/Central-Coast-Calendar), or the Kariong Eco Garden Working Bee also on 12 Sep – BYO gloves and tools (https://www.kariongecogarden.org.au).
The Wyong Spring Show is also on this coming weekend 12-13 Sep from 9am-4pm each day at Royale Orchids 70 Brieses Road, Peats Ridge (www.royaleorchids.com.au).
Cheralyn Darcey is a gardening author, community garden coordinator and a co-host of ‘The Gardening Gang’ 8am every Saturday on Coast FM.
cheralyndarcey@gmail.com